Zen Os
ZEN-OS is a modern Obsidian command center with Google Classroom sync, AI assistant, CTF tracker, Pomodoro timer, and quick links in a single dashboard.
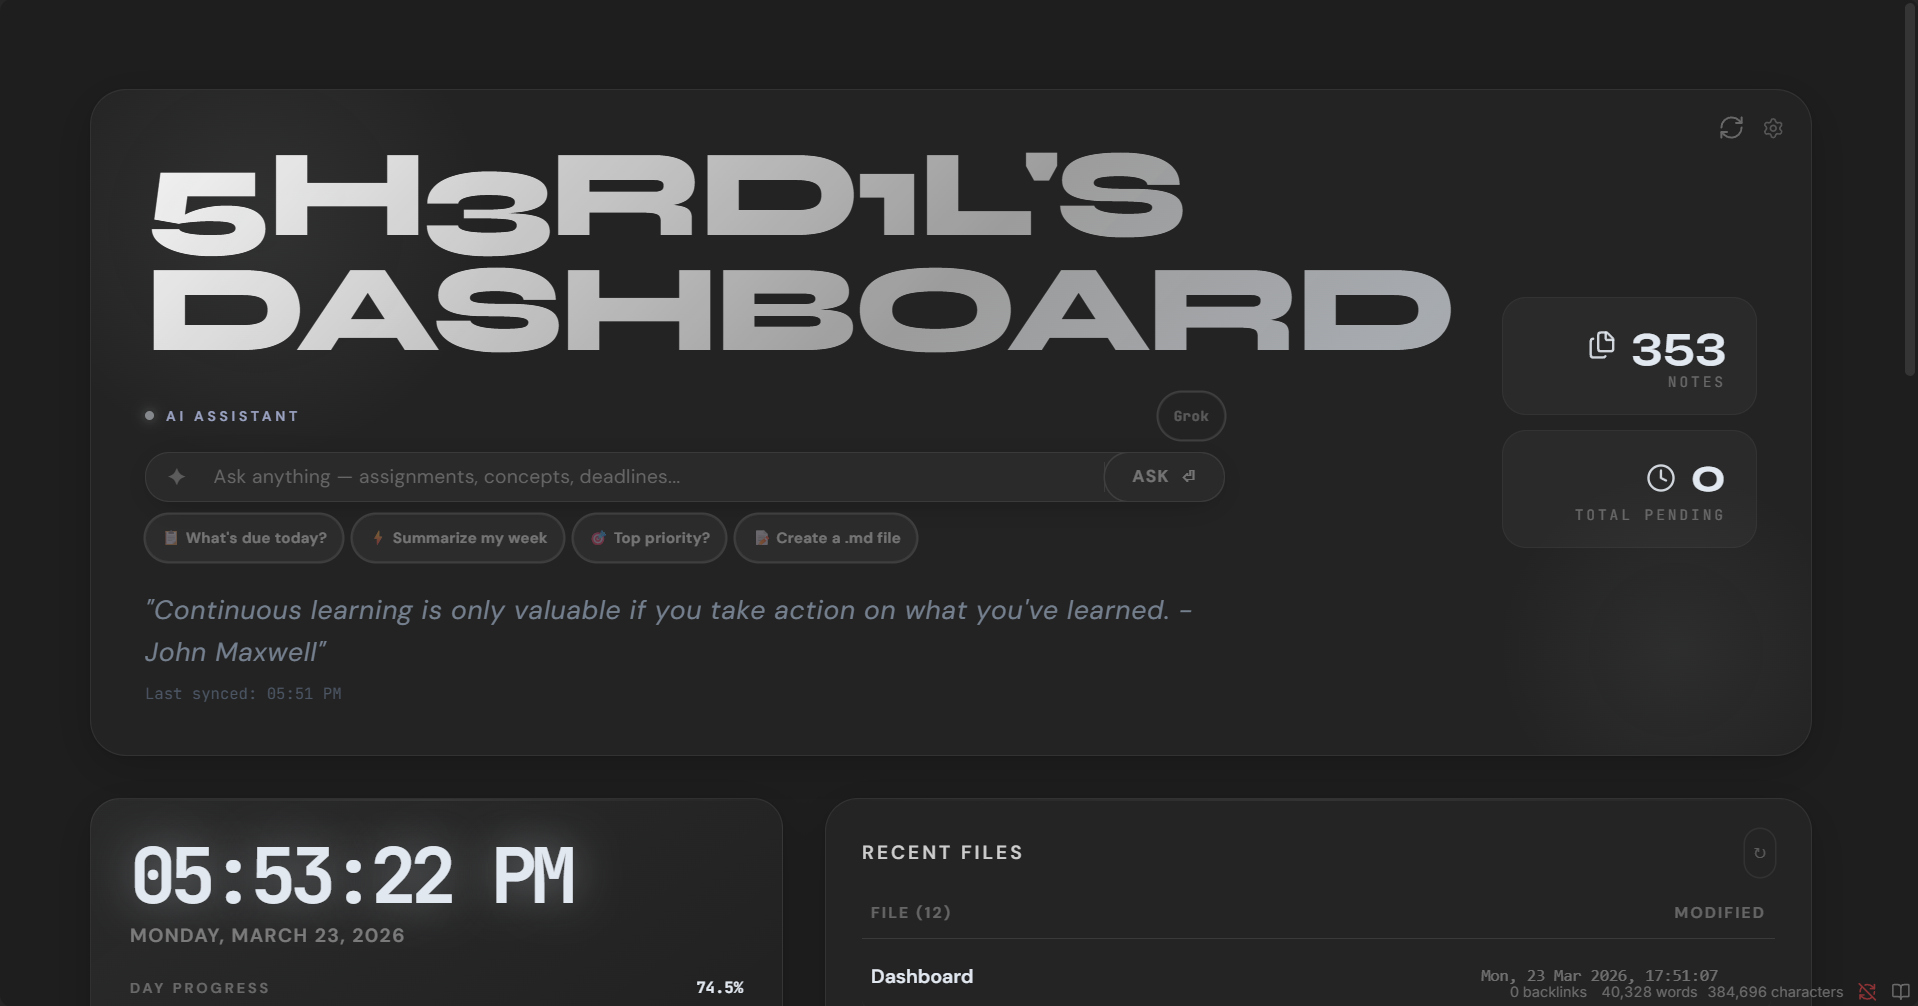
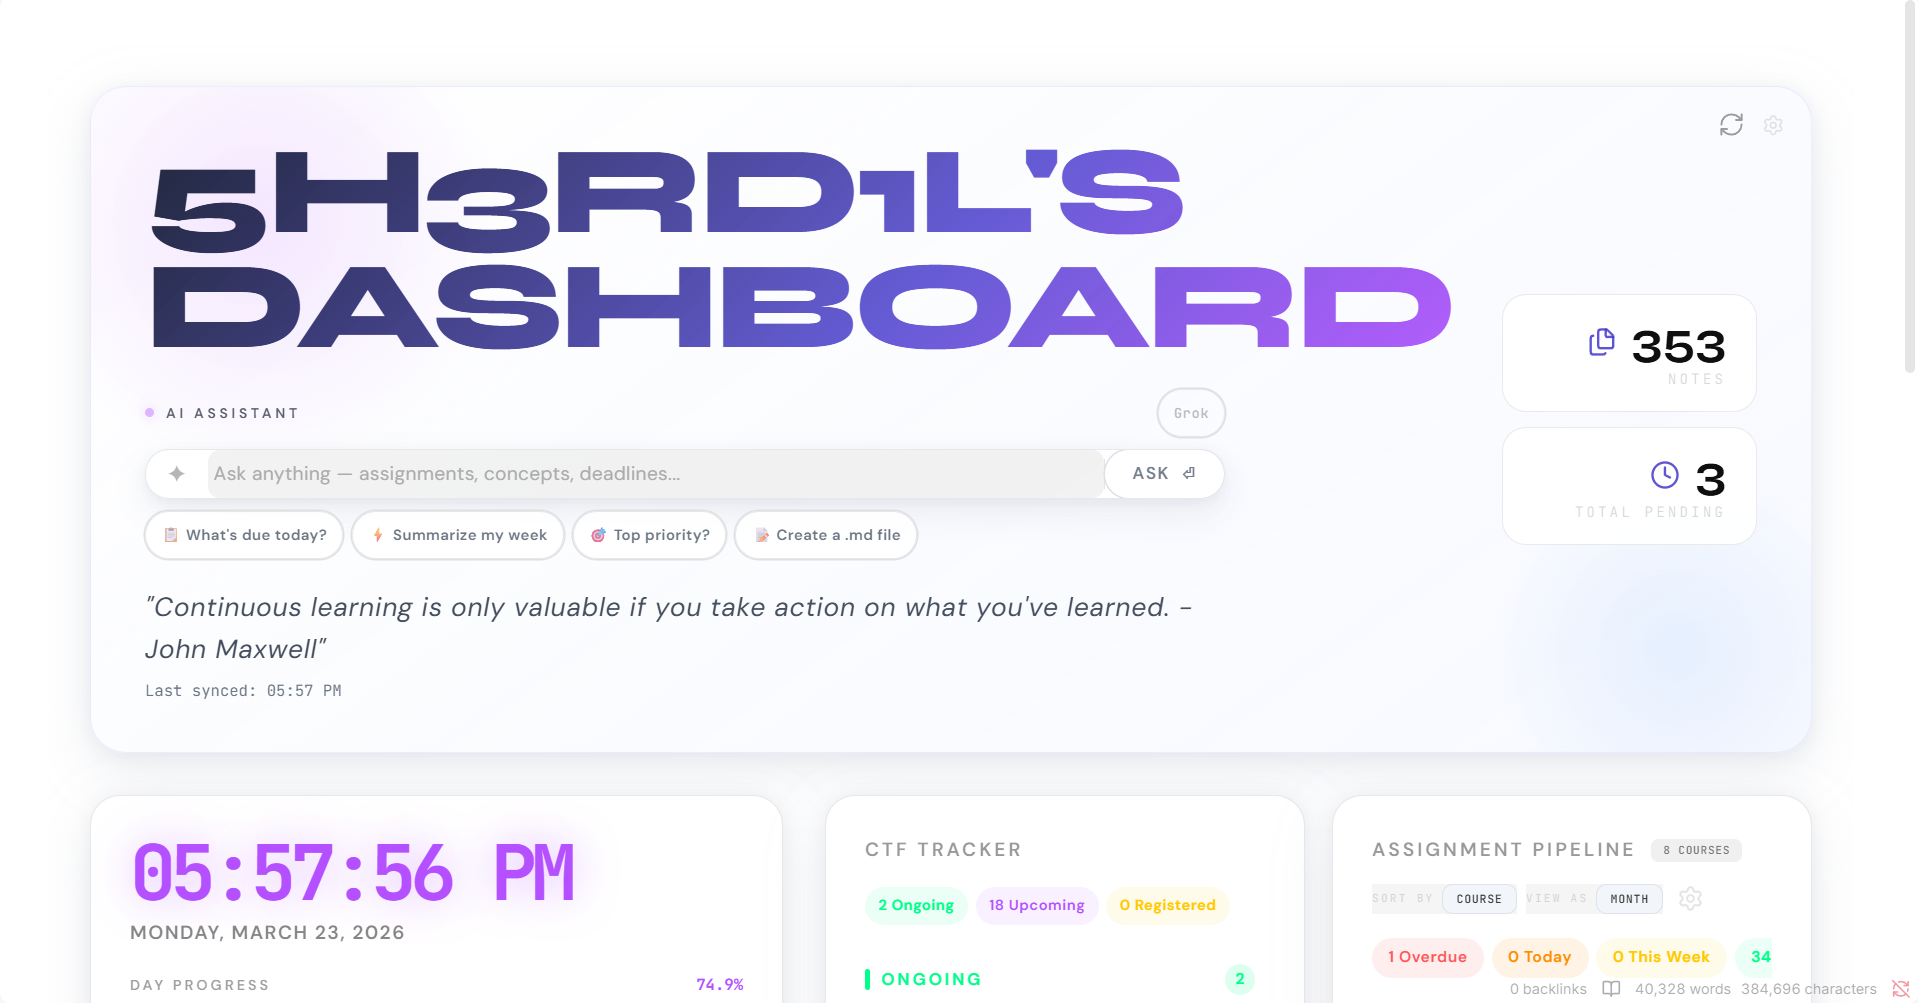
✦ ZEN-OS Dashboard
A professional Obsidian command center with Google Classroom sync, AI assistant, CTF tracker, and quick links — all in a single dataviewjs note.
📦 Download ZEN-OS v5.0 — unzip and copy into your vault. That's it.
📸 More Screenshots
 |  |
 |  |
 |  |
 |
Features
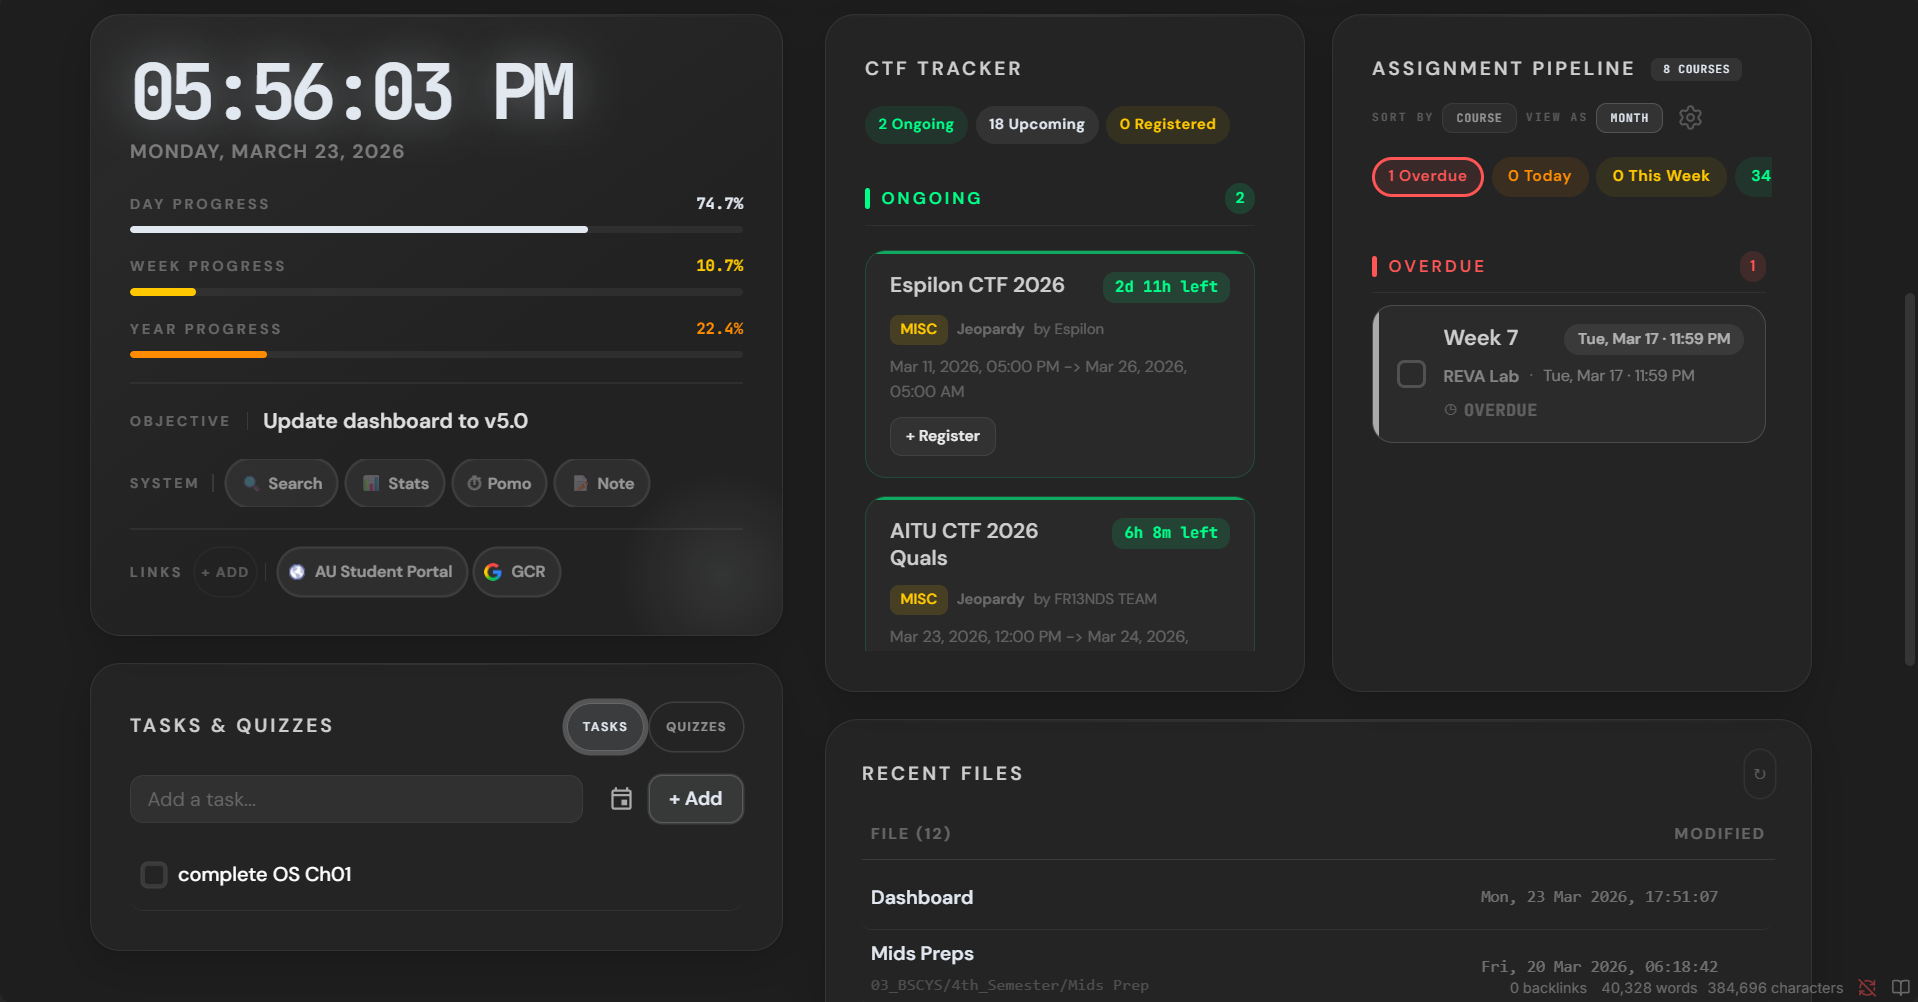
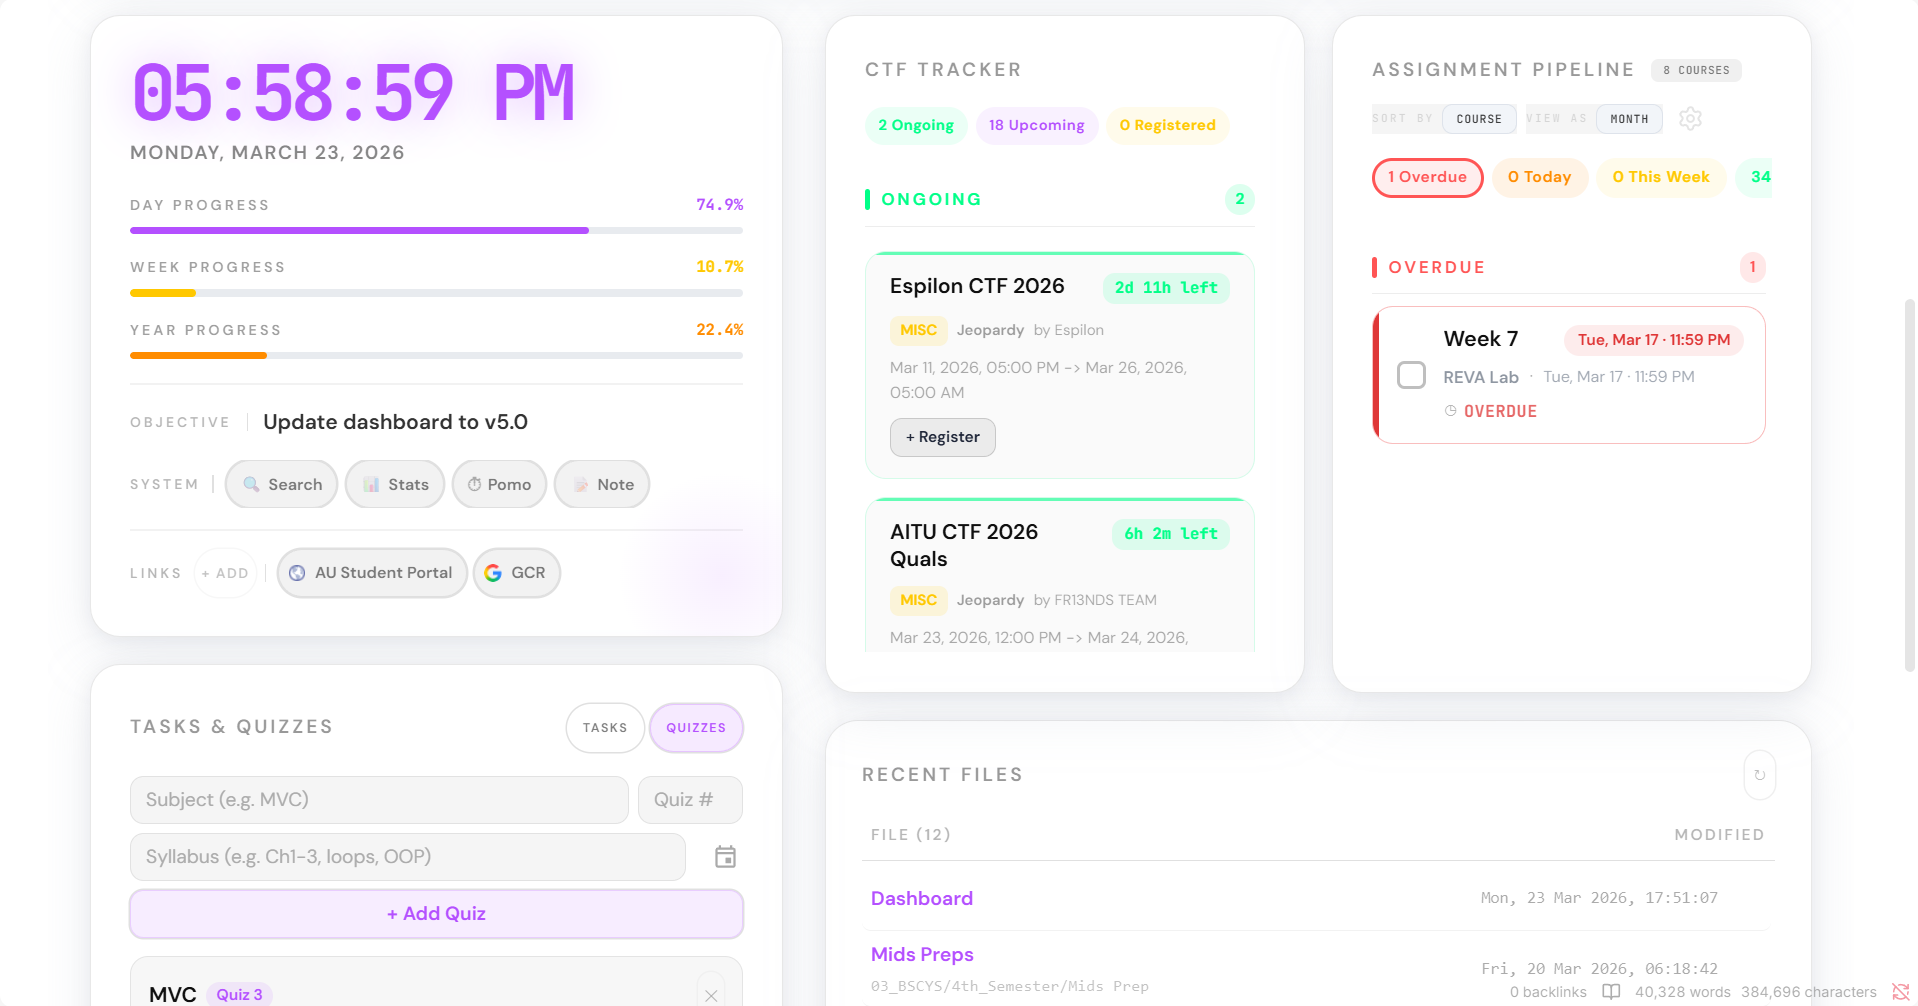
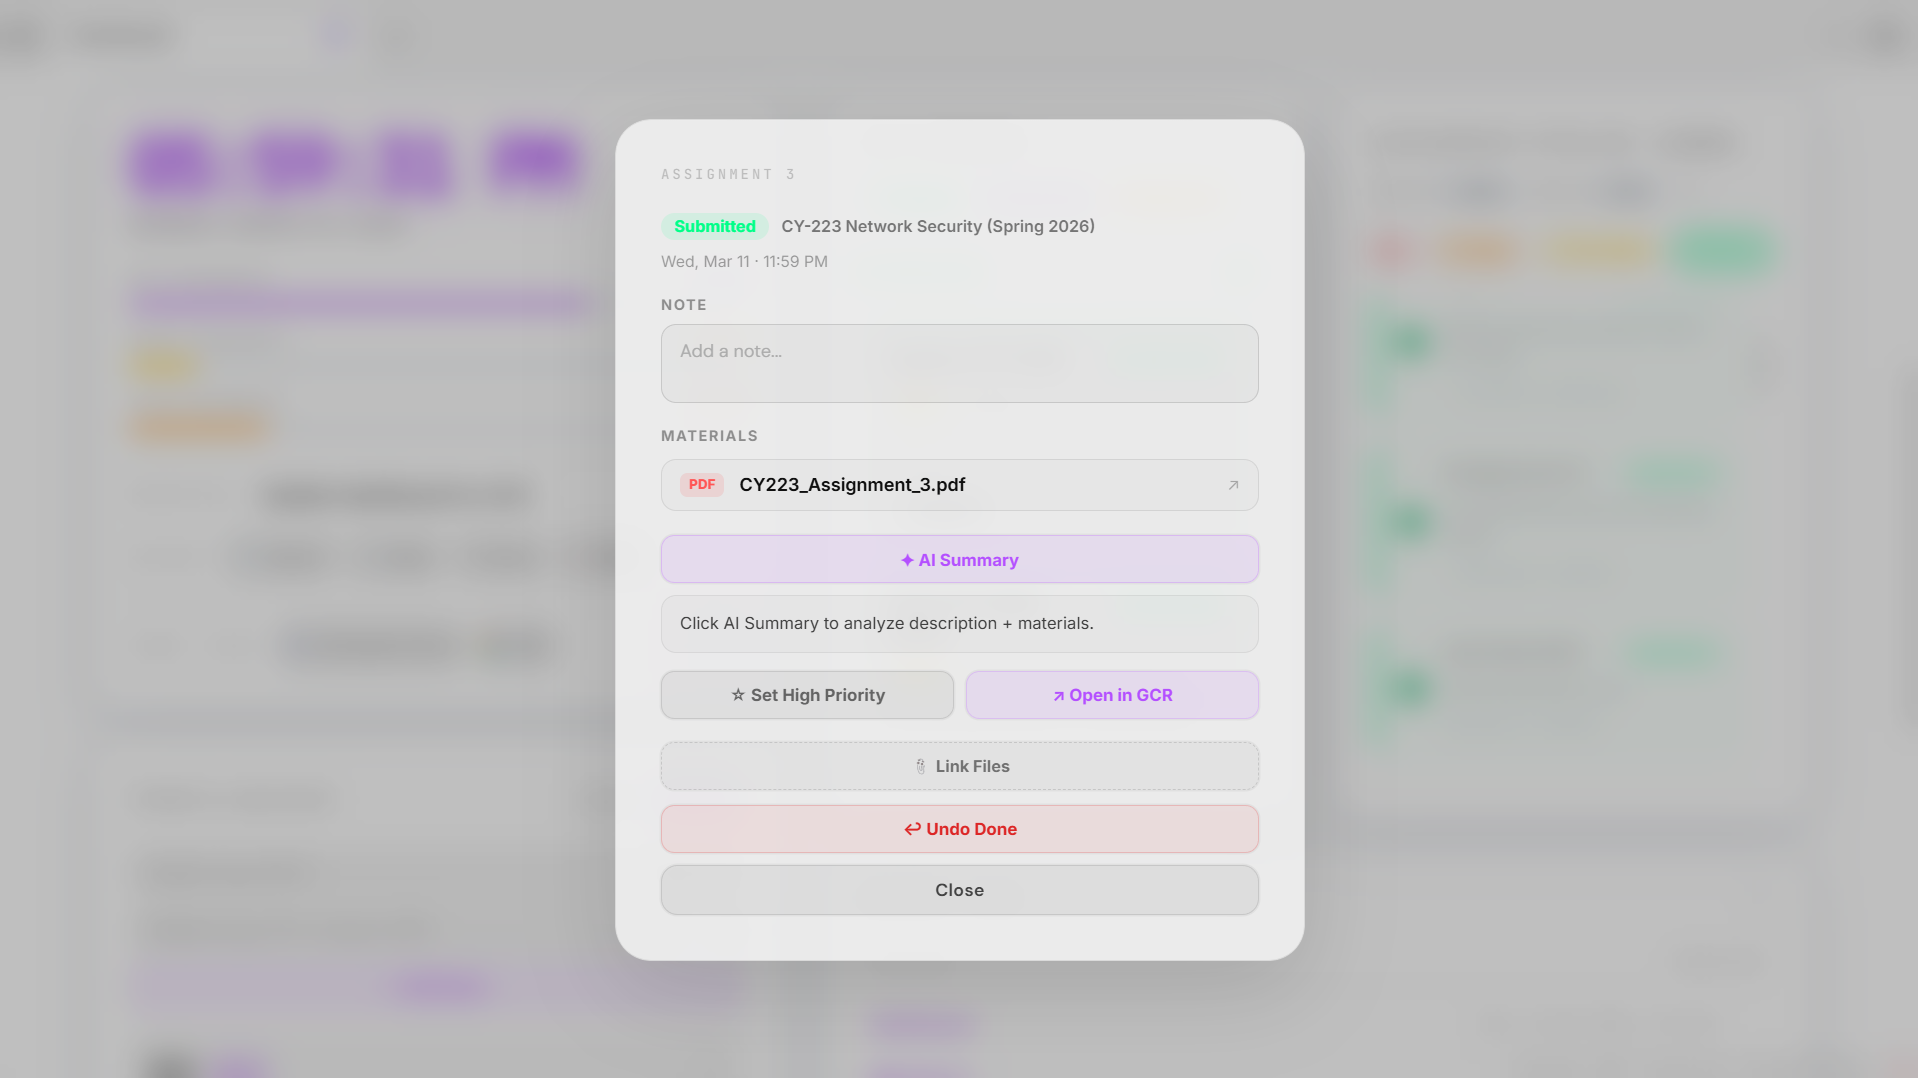
- Assignment Pipeline — Syncs all Google Classroom assignments with due dates, live countdowns, urgency coloring, priority levels, and calendar view
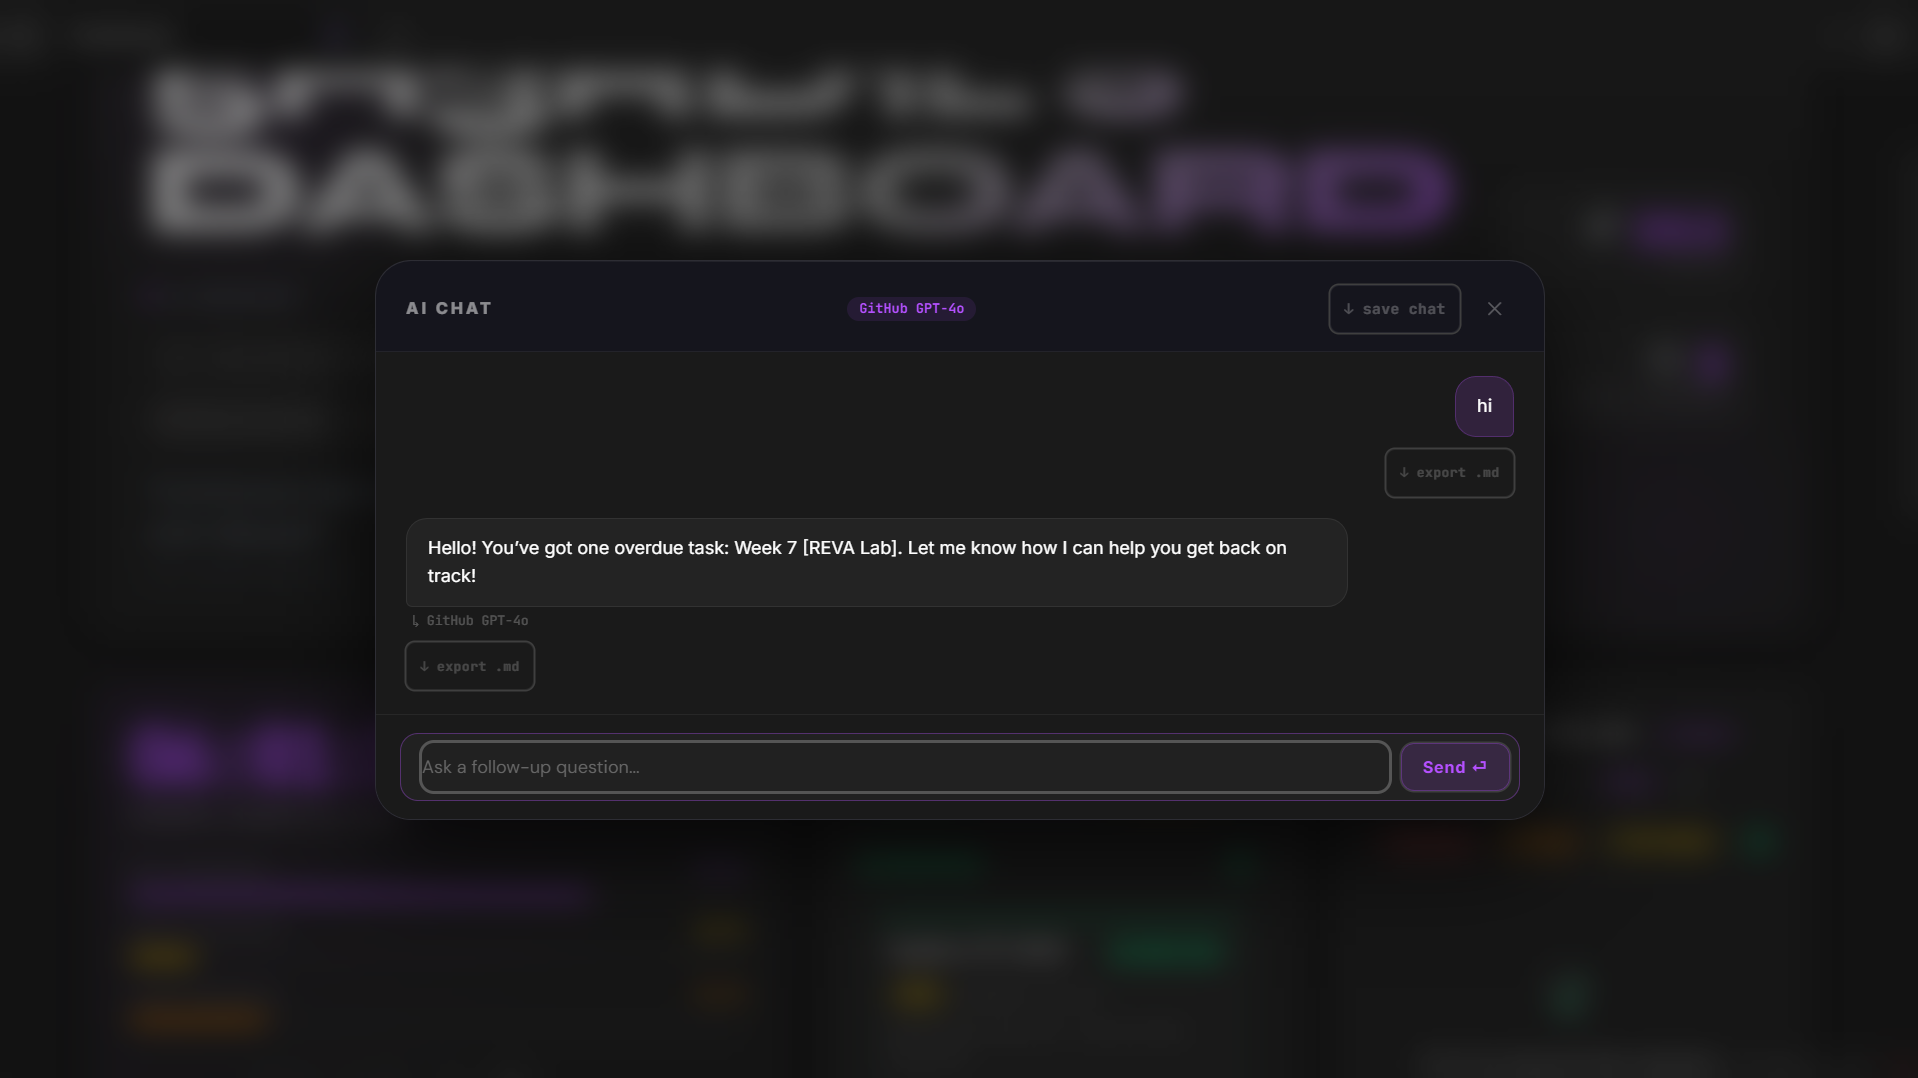
- AI Assistant — Powered by Groq / Gemini / OpenAI / OpenRouter / Together / Grok with full vault search, persistent memory across sessions, follow-up chat, and save-to-note
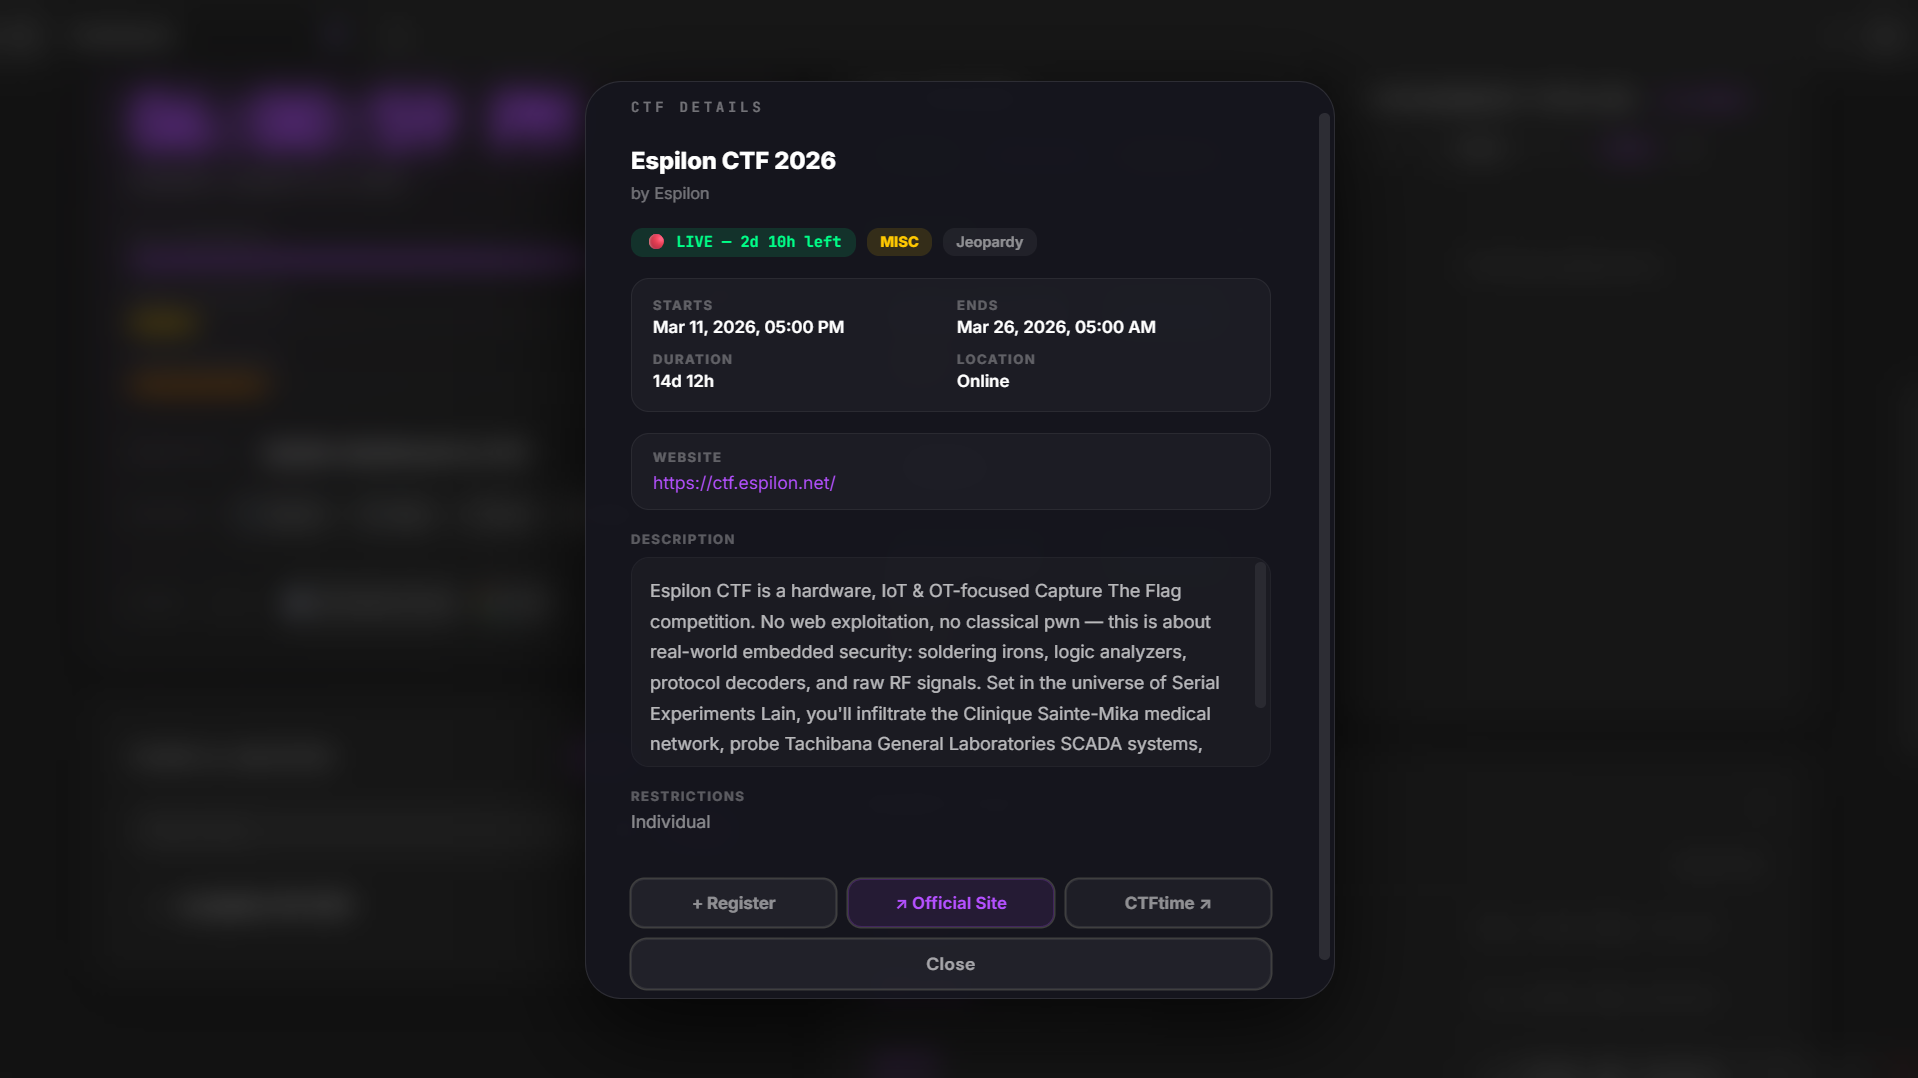
- CTF Tracker — Live feed from CTFtime.org with registration tracking and event details
- Quick Links — Bookmark manager with categories and AI auto-fill
- Task List — Built-in task manager with priorities, notes, and quiz mode
- Recent Files — Most recently modified vault files, shown inline
- Setup Wizard — A full-screen 8-step wizard guides you through everything on first launch
- Resizable cards — Drag the right edge to resize cards across a 4-column grid
- Drag-to-reorder cards — Rearrange all cards on both columns
- Pomodoro timer — Built into the System card
- Vault search — Full-text search across all your notes, used automatically by the AI
- Per-provider model override — Switch AI provider and model inline from the chat header
- Dark / Light mode — Auto-detected, full CSS variable support for both themes
Requirements
| Requirement | Details |
|---|---|
| Obsidian | Any recent version |
| Dataview plugin | Community plugin — enable JavaScript queries |
| Google Workspace plugin | Companion plugin (included) — for Calendar / Classroom / Drive sync |
| Google account | For Classroom + Drive sync |
| AI key (optional) | Groq is free and recommended |
Installation
1. Copy the files
your-vault/
├── Dashboard.md
├── .obsidian/
│   ├── snippets/
│   │   └── Dashboard-Zen.css
│   └── plugins/
│       └── google-workspace-obsidian/
│           ├── main.js
│           ├── manifest.json
│           └── styles.css
2. Enable the CSS snippet
Open Obsidian → Settings → Appearance → CSS Snippets → enable Dashboard-Zen.
3. Enable the Dataview plugin
Go to Settings → Community Plugins → Browse, search Dataview, install and enable it. Then in its settings, turn on Enable JavaScript Queries.
4. Enable the Google Workspace plugin
Enable it from Settings → Community Plugins. Then go to its settings tab to connect your Google account.
5. Open the dashboard
Open Dashboard.md in Reading View (not Editing View). The setup wizard will launch automatically.
Setup Wizard
The wizard runs on first launch and walks you through:
- Welcome — overview of features
- Plugin — checks if the Google Workspace plugin is installed and connected
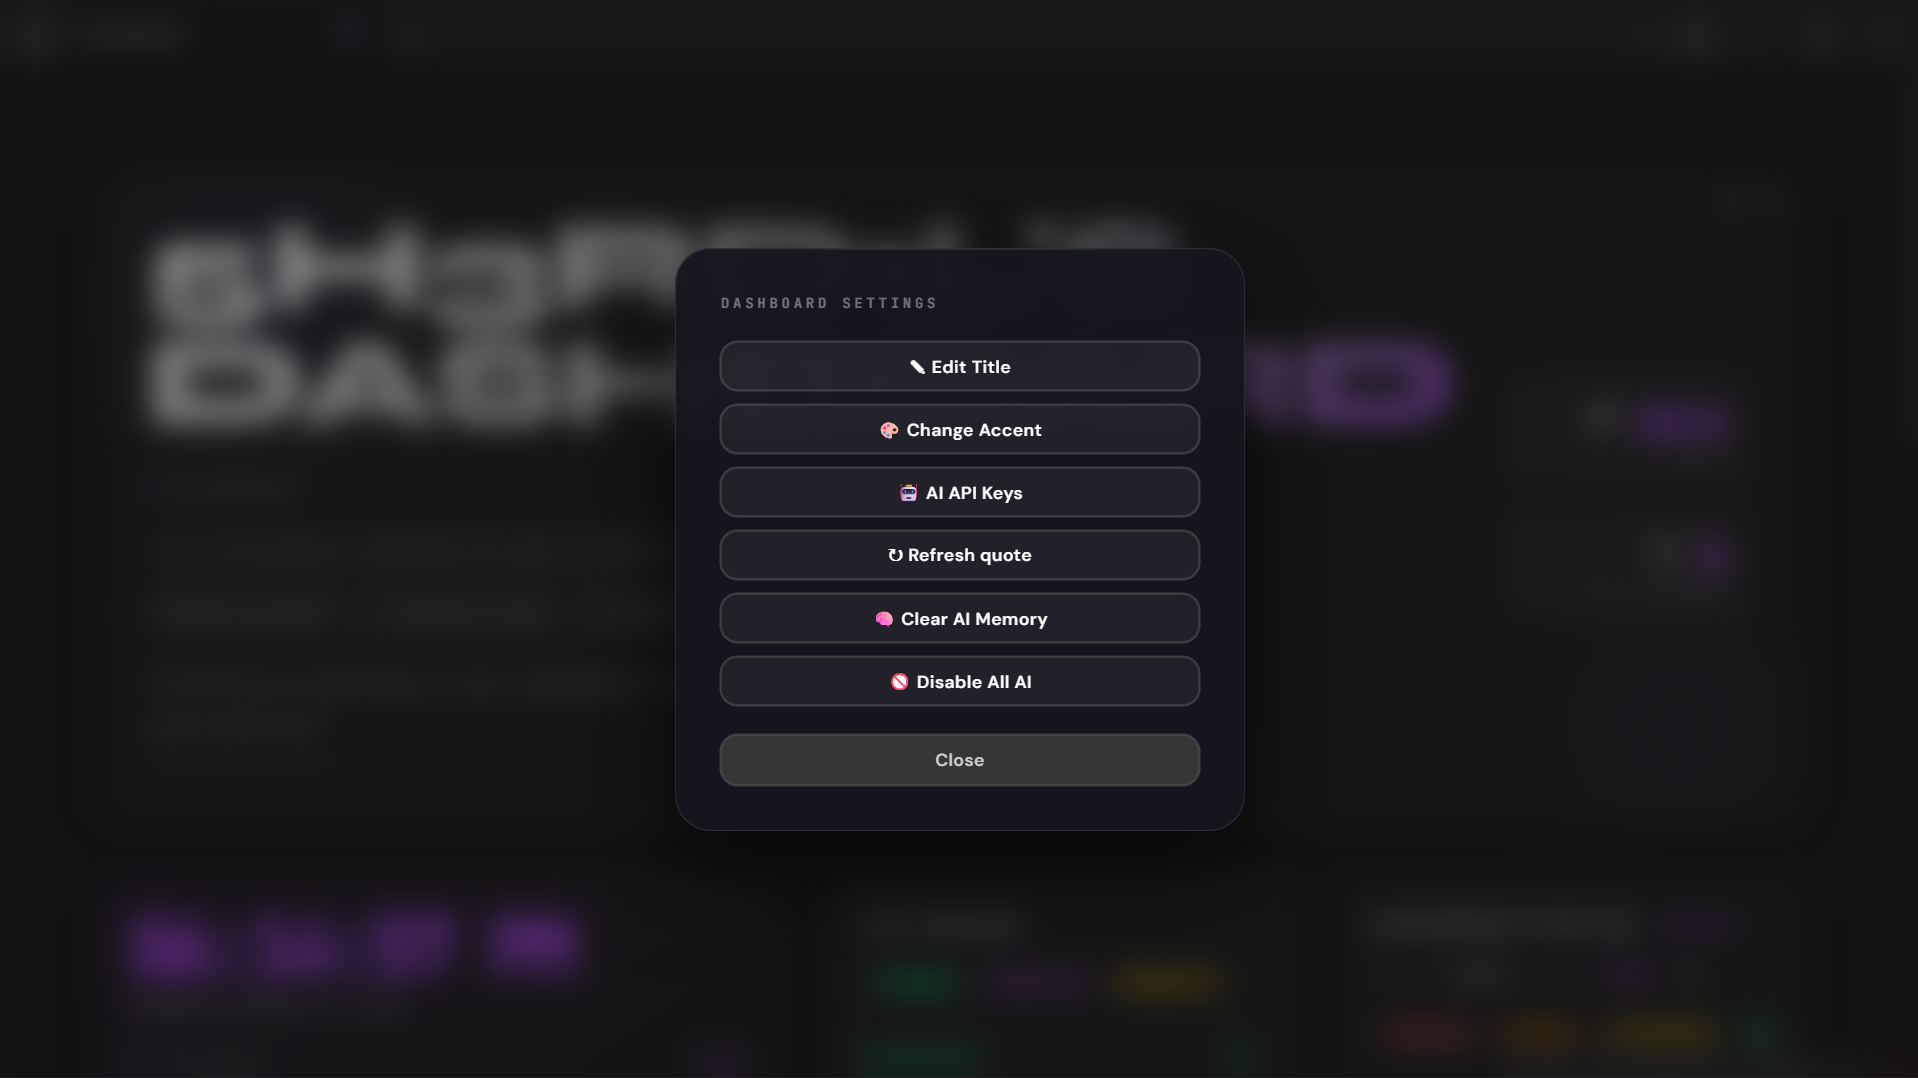
- Branding — set your dashboard title and tagline
- Theme — pick one of 8 accent colors (saved as a CSS snippet to your vault)
- Google — connect your Google account via OAuth
- AI — add an API key (Groq is free and fastest)
- Review — confirm everything before saving
- Launch — confetti, countdown, done
After the wizard completes, it saves a CSS snippet and a config note to your vault.
To re-run the wizard: clear zos-wizard-complete and zos-setup-complete from localStorage (or use the dashboard settings menu).
Getting a Free AI Key
The AI assistant supports multiple providers with automatic fallback. Groq is recommended — it's free and fast.
| Provider | Free Tier | Get Key |
|---|---|---|
| Groq ✓ | Yes | console.groq.com/keys |
| Gemini | Yes | aistudio.google.com/app/apikey |
| OpenRouter | Yes (some models) | openrouter.ai/keys |
| Together | Yes (some models) | api.together.xyz |
| OpenAI | No | platform.openai.com/api-keys |
| Grok (xAI) | No | console.x.ai |
Paste the key in the wizard's AI step. You can configure multiple providers — the dashboard tries them in order and falls back automatically if one is rate-limited.
Google OAuth Setup (for developers forking this)
The companion plugin handles OAuth via a Cloudflare Worker proxy. If you fork this project and want your own OAuth client:
- Go to Google Cloud Console → APIs & Services → Credentials
- Create an OAuth 2.0 Client ID (Web application)
- Enable these APIs: Google Calendar API, Google Classroom API, Google Drive API
- Update the worker URL in the plugin's
main.js
File Structure
zen-os/
├── Dashboard.md                          ← Main dataviewjs note
├── .obsidian/
│   ├── snippets/
│   │   └── Dashboard-Zen.css             ← Stylesheet (enable in Appearance settings)
│   └── plugins/
│       └── google-workspace-obsidian/
│           ├── main.js
│           ├── manifest.json
│           └── styles.css
└── README.md                             ← This file

Auto-created by wizard:
_config/
├── zen-os-config.md                      ← Your settings
└── ai-keys.md                            ← Optional: store GitHub/Grok keys here
Storing AI Keys in Vault (Optional)
Instead of entering keys in the wizard, you can store them in _config/ai-keys.md:
github_key: your_github_models_key_here
grok_key: your_grok_key_here
The dashboard reads this file on every load and registers them as AI providers automatically.
Keyboard Shortcuts
| Key | Action |
|---|---|
→ or Enter | Next step in wizard |
← | Previous step in wizard |
Troubleshooting
Assignments not loading
- Make sure the Google Workspace plugin is installed, enabled, and connected to your Google account
- Click the refresh icon (↺) in the top-right of the header
- Re-run the setup wizard if needed
AI not responding
- Open browser console (
Ctrl+Shift+I) and look for errors - Make sure your API key is valid — re-enter it via the dashboard settings menu
- Groq and Gemini have rate limits; the dashboard will auto-retry other providers
- If all providers are rate-limited, wait ~30 minutes
Accent color not applying
- Go to Settings → Appearance → CSS Snippets and make sure
Dashboard-Zenis enabled - If it's missing, re-run the wizard to regenerate it
Wizard appears again after setup
- This can happen if localStorage was cleared; just run through the wizard again
CTFs not loading
- CTFtime.org has CORS restrictions; this uses Obsidian's
requestUrlto bypass them - Only works inside Obsidian (not in browser preview)
Credits
Built with Obsidian, Dataview, and the Google Calendar Plugin.
Fonts: Syne, DM Sans, JetBrains Mono.
CTF data from CTFtime.org.
License
MIT — free to use, modify, and share. Attribution appreciated but not required.
How to Install
- Download the repository ZIP below
- Unzip it and find the CSS snippet file
- Move the CSS file into your vault's
.obsidian/snippets/folder - Open Obsidian → Settings → Appearance → CSS Snippets → Enable it
Stats
Stars
56
Forks
4
Last updated 3mo ago
Categories